My previous posts about headshots have focused on the type of shot that’s right for you and how to get it. This post will focus more on issues that come up after the images have been captured. This includes topics like image selection, image cropping, and image size/format.
How Many Final Images Do You Really Need?
At this point, let’s assume you’ve made all the right choices about the style of portrait that was created, and your clothing and grooming were all perfect too (see Part 1 and Part 2 for more on these parts of the process). Now there are probably 20-50 functional images ready for you to review and make your selection(s). How many do you really need for final use? Typically, the right answer is “1”. The most valid exception to this is “2” and that’s usually one shot that’s more formal and one that’s more casual. And typically, the formal/casual aspect is controlled by clothing. For men, this often means a shot with a tie and another without. As the photographer, I’d love for you to pick as many as possible because that usually means more profit for me, but the reality is that people don’t typically USE more than one or two. Your final choices will be processed and retouched and that’s the main reason why the cost goes up when additional images selected. Retouching takes considerable time and skill at the computer (hundreds of mouse clicks) and it makes you look your best. My process and pricing usually includes one retouched image with the basic fee but allows the client to download lower-resolution un-retouched images from the gallery at no additional cost.
Use a Gallery to Make Your Selection
How do you make the selection of which image to use and have retouched? Some photographers and clients suggest making your selection at the end of the photoshoot. I’m not a fan of this process because it often results in a rushed selection that the client later regrets. Whether the images are viewed on a tethered monitor or the back of the camera, it’s still usually a rushed process. A better approach is to use a private web gallery to make your selection over a week or two. Many people find it helpful to get input from friends and family. My recommendation is to make your selection based on the merits of the image as a whole. I mean, clients often select their final image based on the absence of tiny things that bother them. For example, perhaps there’s something imperfect about their left earlobe so they reject shots showing their left side. Typically, viewers of the image will never notice the little thing about which the subject is so sensitive. And viewers are NOT going to download the image and zoom in to 1000% to inspect for flaws. Instead, they will view it for 1-2 seconds at the size that it’s displayed on their screen. Then they will form a quick impression, such as “professional,” “approachable,” “strong,” “smart,” or “confident.” So don’t choose an image to represent you that’s lifeless just because it’s the one that hides your imagined “faults.”
The Crop
A “crop” is the process of selecting the section of the image to use and eliminating the rest. This is a critical step but is often difficult for clients to decide upon. Luckily, most clients are one of several being photographed at their firm and yours will be cropped exactly like your peers. This is not saying that you are the same as everyone else, but that consistency reflects well on any company. The key elements of a crop are the overall proportions and how much of the image is taken up by the face. Proportions are not the same thing as size. Size is absolute, like 8×10 inches. Proportions refer to the ratio between the length of one side of the image to the other side (written as side1:side2). Typical proportions are 1:1 (square), 2:3 (same as 4:6), 4:5 (same as 8:10), 5:7, but anything is possible (even a circular crop). These proportions harken back to common photo print sizes, like 5×7 or 8×10 inch prints. Finally, non-square headshot crops are typically oriented vertically – not horizontally.
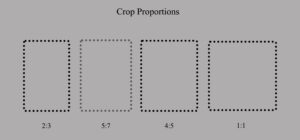
The approximate crop you are seeking is good to know before you are photographed. The photographer should always capture the image with a little extra space around the edges to allow a good range of cropping options later. But too much extra space around the edges means there are less pixels devoted to the face area and quality can suffer if you later crop in tight to the face and also produce a large output file.
Once the proportions are set, it’s a matter of deciding how much relative space the face should occupy in the total image area. Making this choice is partly practical and partly a matter of taste. The practical side is that you don’t want a shot with lots of body if it’s going to be displayed at thumbnail size because the viewer won’t be able to see your face well enough to identify you or form an impression. The “taste” side is more about intimacy and formality. I think the most common crop allows the face to take about 50-60% of the vertical space in the image. A crop that is very tight (close-in) and uses almost all the vertical space for the face is sometimes more intimate, unless it’s just a mug-shot style badge photo. When the client doesn’t have a preference, I select 4:5 proportions, vertical orientation, and about 60% of the image devoted to the face.
Image Size and File Format
Image size refers to the absolute size of the image, which is different from proportions that were discussed above. In the old days, the size would refer to print size (eg, 8×10 inch paper print) but now it’s the digital dimensions that are most relevant. The unit of size for an image in the digital world is pixels. A modern LED screen is made up of thousands or millions of individual points of light, also known as picture elements or “pixels”. My iMac screen is a “5K” screen that is made up of 5120 columns of pixels and 2880 rows of pixels. That means the image you see is really made up of 5120 times 2880 or a total of 14,745,600 individual spots of colored light. The greater the density of pixels, the more photo-realistic the image will appear. Imagine if you had to display a portrait with only 14 pixels instead of 14 million pixels. The same concept applies to the image files you are sending to the display screen.
Image files are specified in pixels too so you want to roughly match the pixel dimensions of the image file with the pixel dimensions that will be allotted to it on the website. When you see a little thumbnail-sized image on the screen, it’s probably displayed in a box that’s defined as approximately 150 pixels tall by 100 pixels wide. The image assigned to that space should ideally be the same size or slightly larger (more pixels). If you assign an image less than 150×100 to that space, it will look grainy and rough. If you assign an image greater than 150×100 to that space, it will generally look ok unless it’s a LOT bigger than the space allowed. In that case, it may actually look less sharp and it is likely to be slow to display on the screen.
It’s common on the About page of company website to see a list of company leaders with a small clickable thumbnail image that links to another page with a full page bio and a larger image of the leader. Not only is the image larger but it might also be a different crop with different proportions than the thumbnail version. This is a more elegant presentation for your company and the executives. The image on the full bio page might be a quarter of the screen so that file should be larger too (e.g., 2000×1600 pixels).
If you’re coming to the conclusion that you might need more than one version of the same image, you are not wrong. Some of my clients request two versions (one large and one small). One client requires 7 versions with specific crop proportions, image sizes and image formats for each version. That can be a lot of work (especially if a lot of people were photographed) so I charge that client a production fee too. Most commonly, I deliver only one file and it’s a fairly large file (typically around 2400×3600 pixels and 3-5 megabytes in size (much larger and it becomes cumbersome in many ways). By delivering one large high quality master file, the client can use it to create copies that are then scaled down and/or re-cropped to serve any need that comes up in the future.
Finally, file format needs to be specified too. There are many many wonderful graphic file formats (PSD, TIF, JPG, PNG, etc.) but in today’s digital world you want a format that is web-friendly unless your ONLY goal is to make a large, high-quality paper print. JPG and PNG are the most common formats in which I deliver headshot images to my clients, and I use JPG a lot more than PNG. JPG is compact (uses mild compression to reduce file size without sacrificing much in quality) and is compatible with just about everything. PNG is mainly used when you need the background of the image to have “transparency,” which allows the background of the webpage to show thru the transparent area of the image file.
I hope this has helped you understand some of the issues that are important to understand after the photography is over. Making good choices in these areas will assure your great new headshot will look great it’s displayed to others.
In the last few years, I’ve noticed that I have a higher success rate landing big multi-day corporate event photography jobs when I’m in direct contact with the actual client or someone with significant responsibility for the success of the event. Sometimes, I get the call from a more junior person whose only job is gathering bids and who can only pass on a basic description of the event. My theory is the lack of information results in a bid that’s more expensive than it has to be. By talking directly with the client/planner, I probably could have discovered ways to reduce the event photography hours (saving the client money) and still get all the photos the client really needs.
For example, a multiday conference hosted at a big hotel often has social events in the evening that usually start with drinks and socializing and lead to dinner and perhaps dancing or entertainment afterward. Photos during a meal are rarely successful (ie, they are rarely flattering) and can be annoying to the guests. After dinner there can be great photo opportunities of awards presentations, speeches, entertainment and dancing. But I’ve found that photos of people dancing and partying till the bitter end are a waste to time and money (you can probably guess why). About 1.5 hours of dancing/partying photos are all that’s really needed so why not save money get a bid that reflects releasing the photographer early.

And how about those photos of conference registration? Yes, a few are often needed by the client but having the photographer arrive at or before the start of registration usually results in expensive standing-around time for the event photographer. About 30 minutes of registration photos is usually plenty.
When I get a chance to really understand the event, I can often suggest changes like this that save some hours on the front and back end of the event. This results in a bid that’s lower than it would have been when I’m only given basic event hours, which is why I’ve noticed that I usually get the job when there’s more direct interaction and participation with the client/planner. I’ve helped the client get all the event photos they need for 10%-20% less cost. Not that I don’t want those extra hours, but clients (and planners) appreciate my respect for their budget and that also makes them repeat customers.
One caveat: Shaving hours in the middle of an event doesn’t always work the same way. You can’t really “expect” the event photographer to go off the clock for 1.5 hours while your guests are between the last session and the start of the evening reception. The photographer is a captive at that point and can’t probably use or enjoy that time so it’s typically not a place to reduce cost. Although, I have occasionally gone off the clock in situations like this, especially when it’s a multiday event and the client has provided a room at the conference hotel (so I have a place to relax other than hiding in the lobby).
I’m reminded of the Geico commercials about 15 minutes saving you 15%. My message is very similar. By taking more time to have a dialogue with me about your event, I can often surprise you with ways to spend less and still get everything you need.
I’m asked to shoot headshots frequently as a corporate photographer. People sometimes assume it’s a trivial process but there are actually many decisions that go into making a great headshot.

Corporate headshot on white background
Perhaps you wonder if you really need a “great” headshot? Why not get a quick shot that’s very inexpensive? Maybe you have a friend or co-worker with an expensive new DSLR. Ugh! Don’t get me started on that…. For most people, getting a great headshot is a great investment. In today’s world, your headshot will probably end up online in more places than you’d guess (e.g., LinkedIn, company website, professional association websites, conference websites, facebook), places that your prospective employers, partners, and customers will probably see. And that matters!
Studies have shown (well not really… but it’s still true) that people view your image for only a second or two but they draw far-reaching conclusions from that quick glance. Hopefully, they’ll conclude that you are smart, confident, professional, competent, and someone they wouldn’t mind working closely with. If not, then it’s probably going to cost you…and you may never even know it. Do you think a prospective client will call and inform you that you didn’t make the cut because your headshot put them off? No, of course not. They will move on and you will never know that you lost an opportunity. That’s why a great headshot is truly an investment.
Headshot or Environmental Portrait?
The first decision on your way to getting a great headshot that’s right for you is selecting the type of headshot, which also has lots to do with what’s in the background of your portrait. Most headshots use an artificial background, which tends to give the shot a more formal look and a “studio” look. Long rolls of seamless paper are a common studio background. Muslin fabrics with subtle patterns are another common background. Textured walls, curtains, and many other artificial backgrounds are also common. Plus, each of these can be modified with lighting too – a glow from bottom to top is a common example. One advantage to a solid or subtle patterned background is that it doesn’t compete with your face! The viewer’s eye naturally goes to your face.

Corporate headshot with traditional artificial background
An environmental portrait is shot in a location that is natural or relevant to the person. Perhaps it’s a famous pianist sitting at her Steinway in a concert hall. Or it could be google’s CEO sitting on a company bike before zipping off before peddling off to somewhere in the googleplex. These are powerful shots and make a strong impression on the viewer if done well. These types of shots are my favorite as a photographer. However, they also require more planning and often rely on things out of our control (weather, lighting, access, etc.). That is to say, they are less predictable and require a little buy-in and flexibility from the subject.

Environmental portrait of Dr. Paul Ehrlich, author of The Population Explosion in greenhouse used for population studies with butterflies

corporate environmental portrait
Somewhere between the artificial background and the environmental portrait is another nice option: The blurry organic background. This is a nice option that appeals to many and can work for almost everyone. The most common example of this is to use trees in the background and blur them in-camera using a very wide lens aperture. Surprisingly, this background can work for people in all professions and ranks (ie, from a psycho-therapist to a CEO). Or a mix of architecture and greenery – blurred once again – is another good variation on this theme. Like the environmental portrait, this type of shot also has an element of unpredictability to it (ie, weather, lighting, season, access).

Corporate headshot with organic background
Finally, there’s one last variation I should mention which involves shooting the portrait on a solid background in a studio setting and then digitally merging it with a background image that is captured separately. You might think that it’s just a matter of knowing how to manipulate Photoshop to extract the person from one image and merge it with the background image. Of course, those steps are required, but it’s the choice of background and compatibility of lighting that will determine if the image will look realistic and natural. I’ve done several jobs like this for large corporate clients and I think I was successful because I shot a lot of background shots inside and outside of their facility (blurred in-camera) and then I matched up the coloring and lighting and tone of the background with the people who seemed to fit them. Some combinations work and others just don’t. Luckily, my clients have left those choices up to me and sometimes I’ll give them the option a couple of backgrounds that work equally well.

Corporate headshot with background substitution
This blog post is getting longer than I’d hoped so I’m going to stop here and cover other important issues — like the value of hair & makeup stylists, clothing choices, and more – in my next post. Your comments and questions are welcome!
These days – especially here in Silicon Valley – corporations need to make their organization look attractive to prospective employees. It’s a competitive market out there and it’s not enough to just post a job on your website and then wait. So smart companies are calling me frequently to shoot what are typically called “action shots” for their website.
Action shots are images of your people in your workplace looking dynamic, fun, attractive (lots of leeway here – no set style for attractive), engaged, smart, intense, and collaborative. Images that show those great people in a cool environment. For example, it might be a shot of a small group having a fun lunch in your colorful catered cafeteria. Or maybe it some shots in a great meeting room with the natural light and bay view showing your team engaged and communicating? And don’t forget the company picnic, team-building event, or celebration to show that fun is part of the job too!

Corporate Photography – Action shot showing people engaged in a meeting. It’s a staged meeting to get the photos. This was the only spot with some nice color in the windows behind them, which really livens things up.
Action shots are primarily about hiring great people, but these shots also have an important psychological effect on your customers and potential partners too. Everyone wants to buy from or work with great people and these shots portray your company in a great light.

Corporate Photography – Action shot showing people collaborating. It’s a staged event to get the photos so the photographer has to provide guidance.
Shooting good action shots is a task that takes patience and creativity and guidance from your corporate photographer. There’s no right or wrong solution and every situation and group are different. Let’s say you want meeting room shots. How wide should the shots be? I typically like to shoot three people next to each other with someone across from them engaging them in conversation. Three people seems like a meeting but allows you to get in tight enough so the expressions on the faces can be seen and felt. To many people and the images become a little distant. Since people are going to be talking and moving, it’s necessary to shoot for a while since most of the shots will have someone with their mouth at an odd angle or their eyes closed and won’t be usable. But in 15-20 minutes, the photographer ought to be able to get a nice handful of shots from a few angles and showing different group dynamics and expressions. Then bring in a second and even a third group or at least mix up the seating for the people you have. You never know what will happen so give the shoot a chance and get a nice collection of subjects if possible. A good photographer will keep the mood light and also give direction because some steering it needed. Surprisingly, people usually have fun with this kind of shoot and say it was a lot better experience than they expected.

Corporate Photography – Action shot showing people in an office meeting. It’s a staged meeting in a tighter area than a conference room. See how the background adds to the image too.